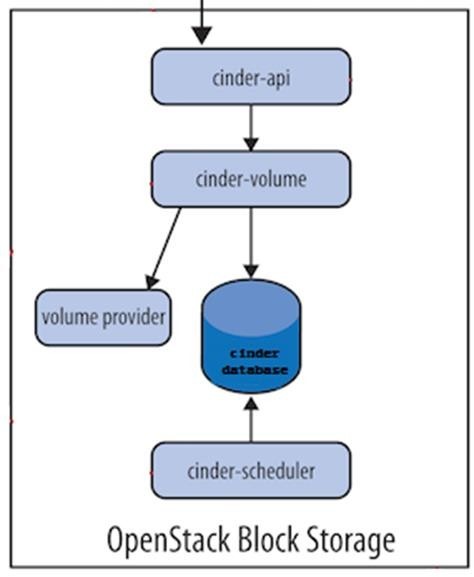
1. Cinder 简介
OpenStack Block Storage Service (Cinder)的功能是实现存储服务,根据实际需要快速为虚拟机提供设备创建、挂载、回收以及快照备份控制等。Cinder是块存储,可以简单的理解成一个移动硬盘,当创建虚拟机需要用到硬盘的时候,会通过Cinder给虚拟机增加一块存储设备,就是刚才说的移动硬盘。Cinder 包括API、调度Scheduler和存储适配cinder-volume3个服务,其中 cinder-volume 可以部署到多个节点上。
1.1 Cinder组件介绍
Cinder 组件主要由以下几个服务组成:
API服务(cinder-api):cinder-api 是主要服务接口, 负责接受和处理外界的 API请求,并将请求放入消息队列,交由后端执行。Cinder目前提供 Volume API V1/V2,ciner监控8776端口。调度服务(cinder-scheduler):选择最优存储提供节点来创建卷。处理任务队列的任务,并根据预定策略选择合适的 Volume Service 节点来执行任务。 目前版本的 cinder 仅仅提供了一个 Simple Scheduler, 该调度器选择卷数量最少的一个活跃节点来创建卷。cinder-scheduler和nova-scheduler类似,根据服务寻找合适的服务器 cinder-volume,发送消息到 cinder-volume 节点,由 cinder-volume 提供弹性云存储服务。卷服务(cinder-volume):,与块存储服务和例如cinder-scheduler的进程进行直接交互。它也可以与这些进程通过一个消息队列进行交互。cinder-volume服务响应送到块存储服务的读写请求来维持状态。它也可以和多种存储提供者在驱动架构下进行交互。该服务运行在存储节点上,管理存储空间,处理 cinder 数据库的维护状态的读写请求,通过消息队列和直接在块存储设备或软件上与其它进程交互。每个存储节点都有一个Volume Service,若干个这样的存储节点联合起来可以构成一个存储资源池。守护进程(cinder-backup): cinder-backup 服务提供任何种类备份卷到一个备份存储提供者。就像 cinder-volume 服务,它与多种存储提供者在驱动架构下进行交互。消息队列:在块存储的进程之间路由信息。
Block Storage Service 服务由 Block Storage Service 控制端和 Block Storage Service 服务节点两部分组成。
其中控制端负责运行 cinder-api 和 cinder-scheduler 程序,负责接收处理对 Block Storage Service 的操作请求并向 Block Storage Service 服务节点发出操作指令,由 Block Storage Service 服务节点上的 cinder-volume 服务来提供为虚拟机使用的块设备服务的真实物理数据文件存储和操作,也就是在该节点上才包含了真正用于块设备服务读写操作的磁盘。
为了支持不同类型和型号的存储,当前版本的 Cinder 为 Volume Service 提供了多种 drivers。常用的如下:
本地存储:LVM,Sheepdog
网络存储:NFS/SAN,RBD(RADOS),ISCSI
分布式存储:Ceph,Glusterfs
2. Cinder控制节点部署环境准备
2.1 创建数据库
1.root 用户连接到数据库
[root@linux-node1 ~]# mysql -uroot -p
2.创建 cinder 数据库
MariaDB [(none)]> create database cinder;

MariaDB [(none)]> show create database cinder;
+----------+-----------------------------------------------------------------+
| Database | Create Database                                                 |
+----------+-----------------------------------------------------------------+
| cinder   | CREATE DATABASE `cinder` /*!40100 DEFAULT CHARACTER SET utf8 */ |
+----------+-----------------------------------------------------------------+
3.配置 cinder 数据库合适的访问权限
MariaDB [(none)]> GRANT ALL PRIVILEGES ON cinder.* TO 'cinder'@'localhost'    IDENTIFIED BY 'cinder';

MariaDB [(none)]> GRANT ALL PRIVILEGES ON cinder.* TO 'cinder'@'%' IDENTIFIED BY 'cinder';
2.2 创建 cinder 用户
1.获得 admin 凭证来获取只有管理员能执行的命令的访问权限
[root@linux-node1 ~]# source admin-openstack.sh
2.创建一个 cinder 用户
[root@linux-node1 ~]# openstack user create --domain default --password-prompt cinder
User Password:  #密码为cinder
Repeat User Password:
+-----------+----------------------------------+
| Field     | Value                            |
+-----------+----------------------------------+
| domain_id | 7f55c04732914c0aa55f666a100a54cc |
| enabled   | True                             |
| id        | 3506da4ab5b44e65b6613a25b4485c6e |
| name      | cinder                           |
+-----------+----------------------------------+
3.授予 admin 角色给 cinder 用户
[root@linux-node1 ~]# openstack role add --project service --user cinder admin
2.3 创建 cinder 服务实体
创建 cinder 和 cinderv2 服务实体
[root@linux-node1 ~]# openstack service create --name cinder   --description "OpenStack Block Storage" volume
+-------------+----------------------------------+
| Field       | Value                            |
+-------------+----------------------------------+
| description | OpenStack Block Storage          |
| enabled     | True                             |
| id          | f6c9a318d20d4129bbe4b6eda3e7e5da |
| name        | cinder                           |
| type        | volume                           |
+-------------+----------------------------------+

[root@linux-node1 ~]# openstack service create --name cinderv2   --description "OpenStack Block Storage" volumev2
+-------------+----------------------------------+
| Field       | Value                            |
+-------------+----------------------------------+
| description | OpenStack Block Storage          |
| enabled     | True                             |
| id          | cd7e37f502914b90b8fa726a1b65f820 |
| name        | cinderv2                         |
| type        | volumev2                         |
+-------------+----------------------------------+
2.4 创建 cinder 服务的 API 入口点
V1访问点创建
[root@linux-node1 ~]# openstack endpoint create --region RegionOne volume public http://192.168.56.11:8776/v1/%\(tenant_id\)s
 volume admin http://192.168.56.11:8776/v1/%\(tenant_id\)s
+--------------+--------------------------------------------+
| Field        | Value                                      |
+--------------+--------------------------------------------+
| enabled      | True                                       |
| id           | 6f25ae5a2fcd41fb8e2a73a8ad609bfc           |
| interface    | public                                     |
| region       | RegionOne                                  |
| region_id    | RegionOne                                  |
| service_id   | f6c9a318d20d4129bbe4b6eda3e7e5da           |
| service_name | cinder                                     |
| service_type | volume                                     |
| url          | http://192.168.56.11:8776/v1/%(tenant_id)s |
+--------------+--------------------------------------------+
[root@linux-node1 ~]# openstack endpoint create --region RegionOne volume internal http://192.168.56.11:8776/v1/%\(tenant_id\)s
+--------------+--------------------------------------------+
| Field        | Value                                      |
+--------------+--------------------------------------------+
| enabled      | True                                       |
| id           | 727e6fbb3ff2411f994282f04e5f6f44           |
| interface    | internal                                   |
| region       | RegionOne                                  |
| region_id    | RegionOne                                  |
| service_id   | f6c9a318d20d4129bbe4b6eda3e7e5da           |
| service_name | cinder                                     |
| service_type | volume                                     |
| url          | http://192.168.56.11:8776/v1/%(tenant_id)s |
+--------------+--------------------------------------------+
[root@linux-node1 ~]# openstack endpoint create --region RegionOne volume admin http://192.168.56.11:8776/v1/%\(tenant_id\)s
+--------------+--------------------------------------------+
| Field        | Value                                      |
+--------------+--------------------------------------------+
| enabled      | True                                       |
| id           | 885a0281159747fa96436408ad6ef587           |
| interface    | admin                                      |
| region       | RegionOne                                  |
| region_id    | RegionOne                                  |
| service_id   | f6c9a318d20d4129bbe4b6eda3e7e5da           |
| service_name | cinder                                     |
| service_type | volume                                     |
| url          | http://192.168.56.11:8776/v1/%(tenant_id)s |
+--------------+--------------------------------------------+
V2访问点创建
[root@linux-node1 ~]# openstack endpoint create --region RegionOne volumev2 public http://192.168.56.11:8776/v2/%\(tenant_id\)s
ne volumev2 admin http://192.168.56.11:8776/v2/%\(tenant_id\)s
+--------------+--------------------------------------------+
| Field        | Value                                      |
+--------------+--------------------------------------------+
| enabled      | True                                       |
| id           | c424e7fbac994390ac3f6dc9d39b4aae           |
| interface    | public                                     |
| region       | RegionOne                                  |
| region_id    | RegionOne                                  |
| service_id   | cd7e37f502914b90b8fa726a1b65f820           |
| service_name | cinderv2                                   |
| service_type | volumev2                                   |
| url          | http://192.168.56.11:8776/v2/%(tenant_id)s |
+--------------+--------------------------------------------+
[root@linux-node1 ~]# openstack endpoint create --region RegionOne volumev2 internal http://192.168.56.11:8776/v2/%\(tenant_id\)s
+--------------+--------------------------------------------+
| Field        | Value                                      |
+--------------+--------------------------------------------+
| enabled      | True                                       |
| id           | 3bf61ac09b9e4b1f8d0b93abf89fedb5           |
| interface    | internal                                   |
| region       | RegionOne                                  |
| region_id    | RegionOne                                  |
| service_id   | cd7e37f502914b90b8fa726a1b65f820           |
| service_name | cinderv2                                   |
| service_type | volumev2                                   |
| url          | http://192.168.56.11:8776/v2/%(tenant_id)s |
+--------------+--------------------------------------------+
[root@linux-node1 ~]# openstack endpoint create --region RegionOne volumev2 admin http://192.168.56.11:8776/v2/%\(tenant_id\)s
+--------------+--------------------------------------------+
| Field        | Value                                      |
+--------------+--------------------------------------------+
| enabled      | True                                       |
| id           | 5734ab255d0849c9a894862d505e38d0           |
| interface    | admin                                      |
| region       | RegionOne                                  |
| region_id    | RegionOne                                  |
| service_id   | cd7e37f502914b90b8fa726a1b65f820           |
| service_name | cinderv2                                   |
| service_type | volumev2                                   |
| url          | http://192.168.56.11:8776/v2/%(tenant_id)s |
+--------------+--------------------------------------------+
3. Cinder部署
3.1 安装并配置组件
1.安装软件包
[root@linux-node1 ~]# yum install -y openstack-cinder
2.编辑
/etc/cinder/cinder.conf,同时完成如下动作:在
[database]部分,配置数据库访问:[database] ... connection = mysql+pymysql://cinder:cinder@192.168.56.11/cinder
在
[DEFAULT]和[oslo_messaging_rabbit]部分,配置RabbitMQ消息队列访问:[DEFAULT] ... rpc_backend = rabbit [oslo_messaging_rabbit] ... rabbit_host = 192.168.56.11 rabbit_userid = openstack rabbit_password = openstack
在
[DEFAULT]和[keystone_authtoken]部分,配置认证服务访问:[DEFAULT] ... auth_strategy = keystone [keystone_authtoken] auth_uri = http://192.168.56.11:5000 auth_url = http://192.168.56.11:35357 memcached_servers = 192.168.56.11:11211 auth_type = password project_domain_name = default user_domain_name = default project_name = service username = cinder password = cinder
在
[DEFAULT]部分,配置my_ip来使用控制节点的管理接口的IP地址。[DEFAULT] ... glance_host = 192.168.56.11
在
[oslo_concurrency]部分,配置锁路径:[oslo_concurrency] ... lock_path = /var/lib/cinder/tmp
3.2 初始化cinder服务的数据库
1.初始化块设备服务的数据库
[root@linux-node1 ~]# su -s /bin/sh -c "cinder-manage db sync" cinder
Option "logdir" from group "DEFAULT" is deprecated. Use option "log-dir" from group "DEFAULT".
2017-04-24 23:55:13.934 5151 WARNING py.warnings [-] /usr/lib/python2.7/site-packages/oslo_db/sqlalchemy/enginefacade.py:241: NotSupportedWarning: Configuration option(s) ['use_tpool'] not supported
  exception.NotSupportedWarning

2017-04-24 23:55:14.151 5151 INFO migrate.versioning.api [-] 0 -> 1...
2017-04-24 23:55:14.877 5151 INFO migrate.versioning.api [-] done
2017-04-24 23:55:14.877 5151 INFO migrate.versioning.api [-] 1 -> 2...
2017-04-24 23:55:15.140 5151 INFO migrate.versioning.api [-] done
...
2.配置计算服务以使用块设备存储
编辑文件
/etc/nova/nova.conf并添加如下到其中:[cinder] os_region_name = RegionOne
4.完成安装并检验
1.重启计算 API 服务:
[root@linux-node1 ~]# systemctl restart openstack-nova-api.service
2.启动块设备存储服务,并将其配置为开机自启:
[root@linux-node1 ~]# systemctl enable openstack-cinder-api.service openstack-cinder-scheduler.service
[root@linux-node1 ~]# systemctl start openstack-cinder-api.service openstack-cinder-scheduler.service
3.查看服务端口
[root@linux-node1 ~]# netstat -tunpl|grep -w "8776"
tcp        0      0 0.0.0.0:8776            0.0.0.0:*               LISTEN      5546/python2
