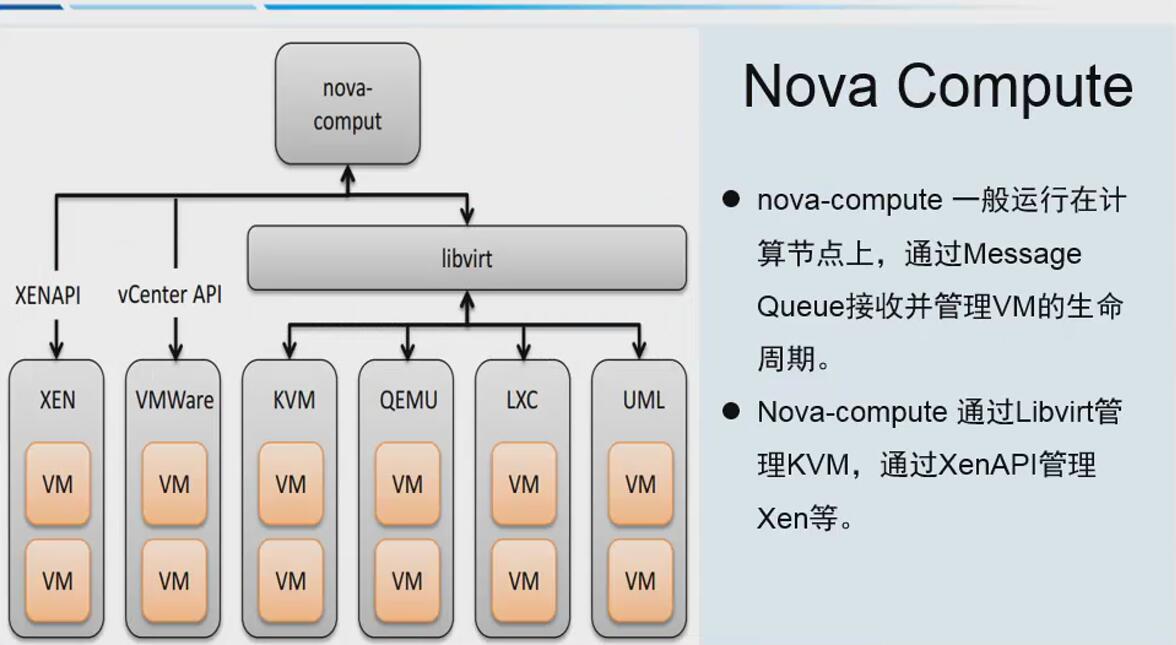
1. Nova计算节点介绍
Nova-compute:通过KVM+Libvirt管理虚拟机
2. Nova计算节点部署
2.1 安装软件包
#首先node2 192.168.56.12虚机打开虚拟化支持,下载软件包,基础软件包之前也安装完啦!
[root@linux-node2 ~]# yum install -y openstack-nova-compute sysfsutils
2.2 同步时间
[root@linux-node2 ~]# ntpdate time1.aliyun.com
 4 Apr 20:27:03 ntpdate[4738]: adjust time server 115.28.122.198 offset 0.003162 sec
[root@linux-node2 ~]# timedatectl set-timezone Asia/Shanghai
[root@linux-node2 ~]# date
Tue Apr  4 20:27:40 CST 2017
2.3 修改/etc/nova/nova.conf文件
#从node1 scp /etc/nova/nova.conf文件过来,注意文件属主权限,要与node1一致

#1.删除数据库配置(计算节点不需要连接数据库,安全性考虑!)
#2.修改vnc配置
[vnc]
...
enabled = True
vncserver_listen=0.0.0.0
vncserver_proxyclient_address=192.168.56.12
novncproxy_base_url=http://192.168.56.11:6080/vnc_auto.html

#3.打开kvm支持
在 /etc/nova/nova.conf 文件的 [libvirt] 区域做出如下的编辑:
[libvirt]
...
virt_type = kvm

Ps:确定您的计算节点是否支持虚拟机的硬件加速。
$ egrep -c '(vmx|svm)' /proc/cpuinfo
如果这个命令返回了 one or greater 的值,那么你的计算节点支持硬件加速且不需要额外的配置。

如果这个命令返回了 zero 值,那么你的计算节点不支持硬件加速。你必须配置 libvirt 来使用 QEMU 去代替 KVM

#4.查看配置文件
[root@linux-node2 ~]# grep "^[a-z]" /etc/nova/nova.conf
enabled_apis=osapi_compute,metadata
auth_strategy=keystone
firewall_driver=nova.virt.firewall.NoopFirewallDriver
use_neutron=true
rpc_backend=rabbit
api_servers=http://192.168.56.11:9292
auth_uri = http://192.168.56.11:5000
auth_url = http://192.168.56.11:35357
memcached_servers = 192.168.56.11:11211
auth_type = password
project_domain_name = default
user_domain_name = default
project_name = service
username = nova
password = nova
virt_type=kvm
enabled=true
lock_path=/var/lib/nova/tmp
rabbit_host=192.168.56.11
rabbit_port=5672
rabbit_userid=openstack
rabbit_password=openstack
vncserver_listen=0.0.0.0
vncserver_proxyclient_address=192.168.56.12
novncproxy_base_url=http://192.168.56.11:6080/vnc_auto.html
[root@linux-node2 ~]# grep "^[a-z]" /etc/nova/nova.conf
enabled_apis=osapi_compute,metadata
auth_strategy=keystone
firewall_driver=nova.virt.firewall.NoopFirewallDriver
use_neutron=true
rpc_backend=rabbit
api_servers=http://192.168.56.11:9292
auth_uri = http://192.168.56.11:5000
auth_url = http://192.168.56.11:35357
memcached_servers = 192.168.56.11:11211
auth_type = password
project_domain_name = default
user_domain_name = default
project_name = service
username = nova
password = nova
virt_type=kvm
enabled=true
lock_path=/var/lib/nova/tmp
rabbit_host=192.168.56.11
rabbit_port=5672
rabbit_userid=openstack
rabbit_password=openstack
vncserver_listen=0.0.0.0
vncserver_proxyclient_address=192.168.56.12
novncproxy_base_url=http://192.168.56.11:6080/vnc_auto.html
3. 启动计算服务及其依赖
[root@linux-node2 ~]# systemctl enable libvirtd.service openstack-nova-compute.service
[root@linux-node2 ~]# systemctl start libvirtd.service openstack-nova-compute.service
4. 验证计算节点服务
出现compute服务说明部署成功,node1、node2时间要同步,否则会失败!
[root@linux-node1 ~]# source admin-openstack.sh
[root@linux-node1 ~]# openstack host list
+-------------------------+-------------+----------+
| Host Name               | Service     | Zone     |
+-------------------------+-------------+----------+
| linux-node1.example.com | consoleauth | internal |
| linux-node1.example.com | conductor   | internal |
| linux-node1.example.com | scheduler   | internal |
| linux-node2.example.com | compute     | nova     |
+-------------------------+-------------+----------+

[root@linux-node1 ~]# nova service-list #查看nova服务
+----+------------------+-------------------------+----------+---------+-------+----------------------------+-----------------+
| Id | Binary           | Host                    | Zone     | Status  | State | Updated_at                 | Disabled Reason |
+----+------------------+-------------------------+----------+---------+-------+----------------------------+-----------------+
| 1  | nova-consoleauth | linux-node1.example.com | internal | enabled | up    | 2017-04-04T12:48:34.000000 | -               |
| 2  | nova-conductor   | linux-node1.example.com | internal | enabled | up    | 2017-04-04T12:48:27.000000 | -               |
| 3  | nova-scheduler   | linux-node1.example.com | internal | enabled | up    | 2017-04-04T12:48:34.000000 | -               |
| 6  | nova-compute     | linux-node2.example.com | nova     | enabled | up    | 2017-04-04T12:48:29.000000 | -               |
+----+------------------+-------------------------+----------+---------+-------+----------------------------+-----------------+

#查看nova中glance配置是否正常
root@linux-node1 ~]# nova image-list
+--------------------------------------+--------+--------+--------+
| ID                                   | Name   | Status | Server |
+--------------------------------------+--------+--------+--------+
| 258e0bf5-af6c-466d-9ef1-5f60bfadb39b | cirros | ACTIVE |        |
+--------------------------------------+--------+--------+--------+
