1. 配置私有网络
阿里云VPC网络
配置服务组件
(在之前配置的基础上改)service_plugins = router
allow_overlapping_ips = True
配置
Modular Layer 2 (ML2)插件ML2插件使用Linuxbridge机制来为实例创建layer-2虚拟网络基础设施编辑
/etc/neutron/plugins/ml2/ml2_conf.ini文件并完成以下操作:1.在
[ml2]部分,启用flat,VLAN以及VXLAN网络:[ml2] ... type_drivers = flat,vlan,vxlan
2.在
[ml2]部分,启用VXLAN私有网络:[ml2] ... tenant_network_types = vxlan
3.在
[ml2]部分,启用Linuxbridge和layer-2机制:[ml2] ... mechanism_drivers = linuxbridge,openvswitch,l2population
4.在
[ml2_type_vxlan]部分,为私有网络配置VXLAN网络识别的网络范围:[ml2_type_vxlan] ... vni_ranges = 1:1000
配置
Linuxbridge代理Linuxbridge代理为实例建立layer-2虚拟网络并且处理安全组规则。编辑
/etc/neutron/plugins/ml2/linuxbridge_agent.ini文件并且完成以下操作:在
[vxlan]部分,启用VXLAN覆盖网络,配置覆盖网络的物理网络接口的IP地址,启用layer-2 population:[vxlan] enable_vxlan = True local_ip = 192.168.56.11 l2_population = True physical_interface_mappings = public:eth0 #将之前测试配置的internet:eth1删掉
配置layer-3代理
Layer-3代理为私有虚拟网络提供路由和NAT服务。编辑
/etc/neutron/l3_agent.ini文件并完成以下操作:在
[DEFAULT]部分,配置Linuxbridge接口驱动和外部网络网桥:[DEFAULT] ... interface_driver = neutron.agent.linux.interface.BridgeInterfaceDriver external_network_bridge =
注解:
external_network_bridge选项特意设置成缺省值,这样就可以在一个代理上允许多种外部网络。启动服务
[root@linux-node1 ~]# systemctl restart neutron-server
[root@linux-node1 ~]# systemctl restart neutron-linuxbridge-agent
[root@linux-node1 ~]# systemctl enable neutron-l3-agent
[root@linux-node1 ~]# systemctl start neutron-l3-agent
[root@linux-node1 ~]# ps aux|grep l3-agent
neutron   16364  9.3  1.3 314924 53684 ?        Ss   23:07   0:04 /usr/bin/python2 /usr/bin/neutron-l3-agent --config-file /usr/share/neutron/neutron-dist.conf --config-dir /usr/share/neutron/l3_agent --config-file /etc/neutron/neutron.conf --config-dir /etc/neutron/conf.d/common --config-dir /etc/neutron/conf.d/neutron-l3-agent --log-file /var/log/neutron/l3-agent.log
计算节点配置
编辑
/etc/neutron/plugins/ml2/linuxbridge_agent.ini文件并且完成以下操作:enable_vxlan = true local_ip = 192.168.56.12 l2_population = true physical_interface_mappings = public:eth0 #将之前配置的internet:eth1删除掉 [root@linux-node2 ~]# systemctl restart neutron-linuxbridge-agent.service #重启linuxbridge
2. 创建自服务网络
2.1 查看neutron服务
[root@linux-node1 ~]# source admin-openstack.sh
[root@linux-node1 ~]# neutron agent-list
+--------------------+--------------------+--------------------+-------------------+-------+----------------+-----------------------+
| id                 | agent_type         | host               | availability_zone | alive | admin_state_up | binary                |
+--------------------+--------------------+--------------------+-------------------+-------+----------------+-----------------------+
| 2d039f59-f185-4fea | L3 agent           | linux-             | nova              | :-)   | True           | neutron-l3-agent      |
| -8175-4f99830621d6 |                    | node1.example.com  |                   |       |                |                       |
| 359b9e64-5cd1      | Metadata agent     | linux-             |                   | :-)   | True           | neutron-metadata-     |
| -499d-             |                    | node1.example.com  |                   |       |                | agent                 |
| 8f94-5da454944257  |                    |                    |                   |       |                |                       |
| 935ffbe4-d5d1-4336 | Linux bridge agent | linux-             |                   | :-)   | True           | neutron-linuxbridge-  |
| -a2ac-aabcbff3c154 |                    | node2.example.com  |                   |       |                | agent                 |
| bca4f7fc-9c45-4ba2 | DHCP agent         | linux-             | nova              | :-)   | True           | neutron-dhcp-agent    |
| -83b6-5f5f9d1974e2 |                    | node1.example.com  |                   |       |                |                       |
| c549a7a4-2c0d-4842 | Linux bridge agent | linux-             |                   | :-)   | True           | neutron-linuxbridge-  |
| -9620-9b1e19625947 |                    | node1.example.com  |                   |       |                | agent                 |
+--------------------+--------------------+--------------------+-------------------+-------+----------------+-----------------------+
2.2 创建私有网络
获取admin凭证
[root@linux-node1 ~]# source demo-openstack.sh
创建网络
[root@linux-node1 ~]# neutron net-create selfservice
Created a new network:
+-------------------------+--------------------------------------+
| Field                   | Value                                |
+-------------------------+--------------------------------------+
| admin_state_up          | True                                 |
| availability_zone_hints |                                      |
| availability_zones      |                                      |
| created_at              | 2017-04-30T04:02:44                  |
| description             |                                      |
| id                      | 71d9ac17-1c9e-4b6e-9afa-870184930fd3 |
| ipv4_address_scope      |                                      |
| ipv6_address_scope      |                                      |
| mtu                     | 1450                                 |
| name                    | selfservice                          |
| port_security_enabled   | True                                 |
| router:external         | False                                |
| shared                  | False                                |
| status                  | ACTIVE                               |
| subnets                 |                                      |
| tags                    |                                      |
| tenant_id               | ab47f14a4ccf4f748f84d5100eb30300     |
| updated_at              | 2017-04-30T04:02:44                  |
+-------------------------+--------------------------------------+
在网络上创建一个子网
自服务网络使用172.16.1.0/24 网关172.16.1.1。DHCP服务负责为每个实例从172.16.1.2 到172.16.1.254中分配IP地址。所有实例使用223.5.5.5作为DNS。
[root@linux-node1 ~]# neutron subnet-create --name selfservice   --dns-nameserver 223.5.5.5 --gateway 172.16.1.1   selfservice 172.16.1.0/24
Created a new subnet:
+-------------------+------------------------------------------------+
| Field             | Value                                          |
+-------------------+------------------------------------------------+
| allocation_pools  | {"start": "172.16.1.2", "end": "172.16.1.254"} |
| cidr              | 172.16.1.0/24                                  |
| created_at        | 2017-04-30T04:03:10                            |
| description       |                                                |
| dns_nameservers   | 223.5.5.5                                      |
| enable_dhcp       | True                                           |
| gateway_ip        | 172.16.1.1                                     |
| host_routes       |                                                |
| id                | f2e976d6-25f3-4150-a9d0-bb109a5c56b0           |
| ip_version        | 4                                              |
| ipv6_address_mode |                                                |
| ipv6_ra_mode      |                                                |
| name              | selfservice                                    |
| network_id        | 71d9ac17-1c9e-4b6e-9afa-870184930fd3           |
| subnetpool_id     |                                                |
| tenant_id         | ab47f14a4ccf4f748f84d5100eb30300               |
| updated_at        | 2017-04-30T04:03:10                            |
+-------------------+------------------------------------------------+
创建路由
私有网络通过虚拟路由来连接到公有网络,以双向NAT最为典型。每个路由包含至少一个连接到私有网络的接口以及一个连接到公有网络的网关的接口
公有提供网络必须包括
router: external选项,用来使路由连接到外部网络,比如互联网。admin或者其他权限用户在网络创建时必须包括这个选项,也可以之后在添加。在这个环境里,我们把public公有网络设置成router: external。1.添加
router:external到provider网络[root@linux-node1 ~]# source admin-openstack.sh [root@linux-node1 ~]# neutron net-update public-net --router:external Updated network: public-net
2.创建路由
[root@linux-node1 ~]# source demo-openstack.sh
[root@linux-node1 ~]# neutron router-create router
Created a new router:
Created a new router:
+-------------------------+--------------------------------------+
| Field                   | Value                                |
+-------------------------+--------------------------------------+
| admin_state_up          | True                                 |
| availability_zone_hints |                                      |
| availability_zones      |                                      |
| description             |                                      |
| external_gateway_info   |                                      |
| id                      | eaa2877f-663b-4ca4-9afa-1a303471f6cf |
| name                    | router                               |
| routes                  |                                      |
| status                  | ACTIVE                               |
| tenant_id               | ab47f14a4ccf4f748f84d5100eb30300     |
+-------------------------+--------------------------------------+
3.给路由器添加一个私网子网的接口
[root@linux-node1 ~]# neutron router-interface-add eaa2877f-663b-4ca4-9afa-1a303471f6cf selfservice
Added interface 1dadef85-4b1c-499f-bf16-91d2989138b1 to router eaa2877f-663b-4ca4-9afa-1a303471f6cf.
4.给路由器设置公有网络的网关
[root@linux-node1 ~]# neutron router-gateway-set eaa2877f-663b-4ca4-9afa-1a303471f6cf public-net
Set gateway for router eaa2877f-663b-4ca4-9afa-1a303471f6cf
3. 验证操作
获取admin凭据
[root@linux-node1 ~]# source admin-openstack.sh
列出网络命名空间。你应该可以看到一个
qrouter命名空间和两个qdhcp命名空间[root@linux-node1 ~]# ip netns qrouter-eaa2877f-663b-4ca4-9afa-1a303471f6cf (id: 2) qdhcp-71d9ac17-1c9e-4b6e-9afa-870184930fd3 (id: 0) qdhcp-f3006de4-de03-4bec-af7f-40d3791b645e (id: 1)
列出路由器上的端口来确定公网网关的IP 地址
[root@linux-node1 ~]#  neutron router-port-list eaa2877f-663b-4ca4-9afa-1a303471f6cf
+--------------------------------------+------+-------------------+----------------------------------------------------+
| id                                   | name | mac_address       | fixed_ips                                          |
+--------------------------------------+------+-------------------+----------------------------------------------------+
| 1dadef85-4b1c-499f-bf16-91d2989138b1 |      | fa:16:3e:e1:f5:d8 | {"subnet_id":                                      |
|                                      |      |                   | "f2e976d6-25f3-4150-a9d0-bb109a5c56b0",            |
|                                      |      |                   | "ip_address": "172.16.1.1"}                        |
| a4560466-cf00-4199-8a2a-b71a2878c99e |      | fa:16:3e:65:cc:cb | {"subnet_id": "0cf4b0dd-79de-44c4-be7c-            |
|                                      |      |                   | ca6d8ee88f09", "ip_address": "192.168.56.103"}     |
+--------------------------------------+------+-------------------+----------------------------------------------------+
修改horizon配置
[root@linux-node1 ~]# vi /etc/openstack-dashboard/local_settings
OPENSTACK_NEUTRON_NETWORK = {
    'enable_router': True,
    'enable_quotas': True,
    'enable_ipv6': False,
    'enable_distributed_router': True,
    'enable_ha_router': True,
    'enable_lb': True,
    'enable_firewall': True,
    'enable_vpn': False,
    'enable_fip_topology_check': True,

[root@linux-node1 ~]# systemctl restart httpd
4. 创建VPC网络
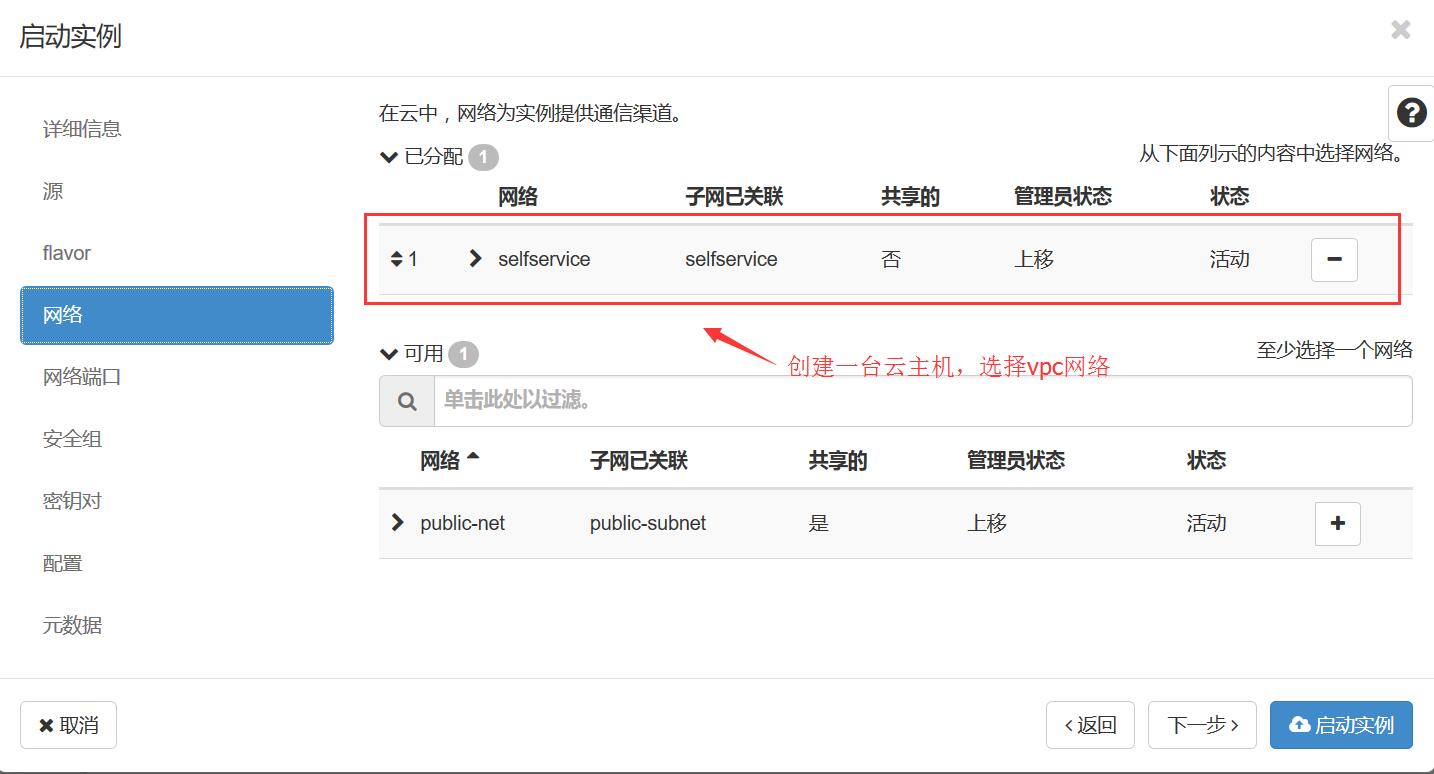
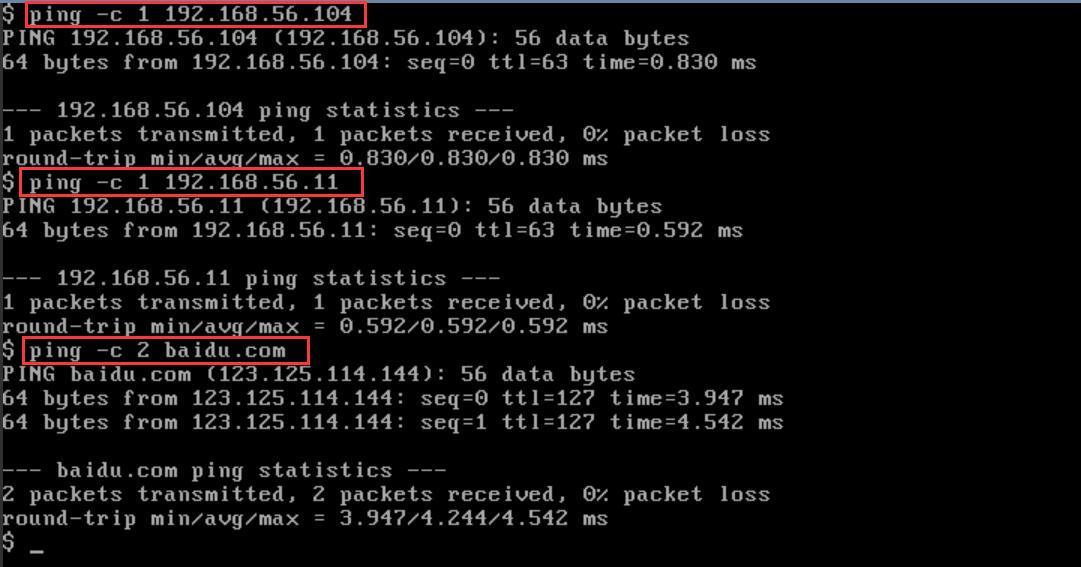
创建两台使用VPC网络的云主机
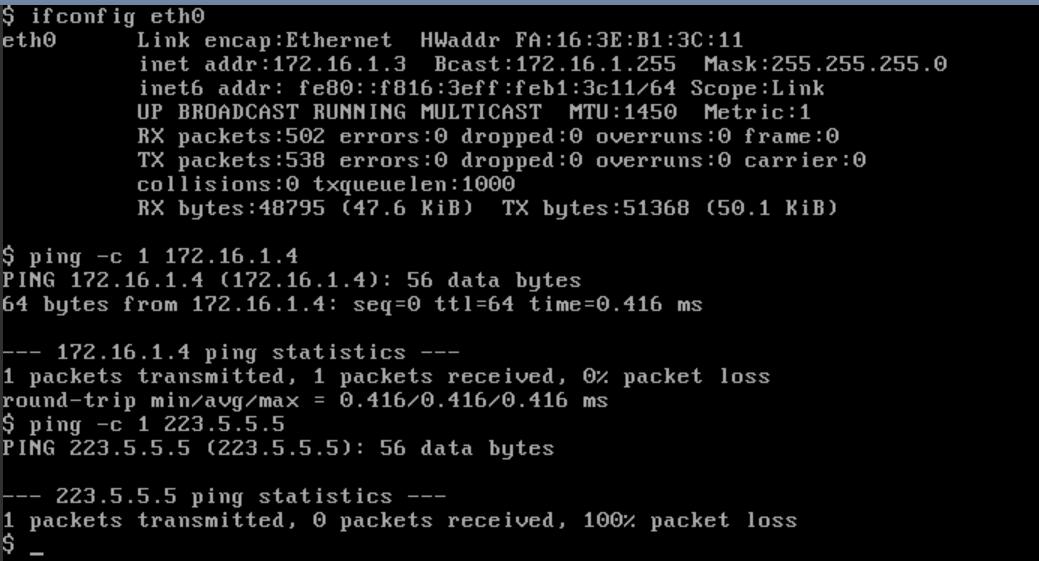
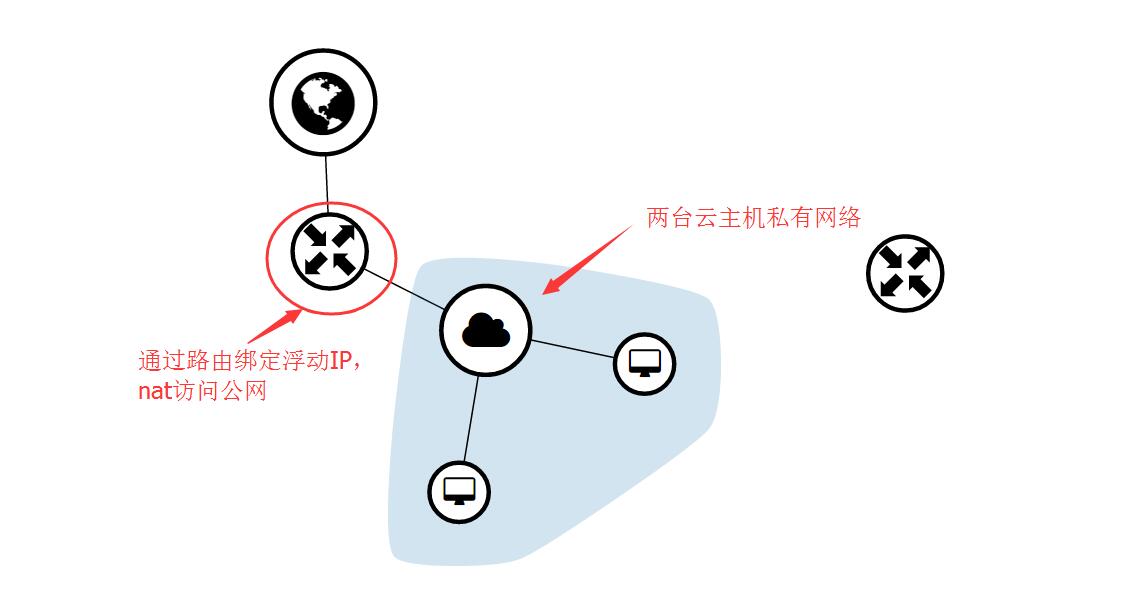
可以发现,内网能互通,但访问不了公网,我们可以绑定一个浮动IP,通过NAT转换上网
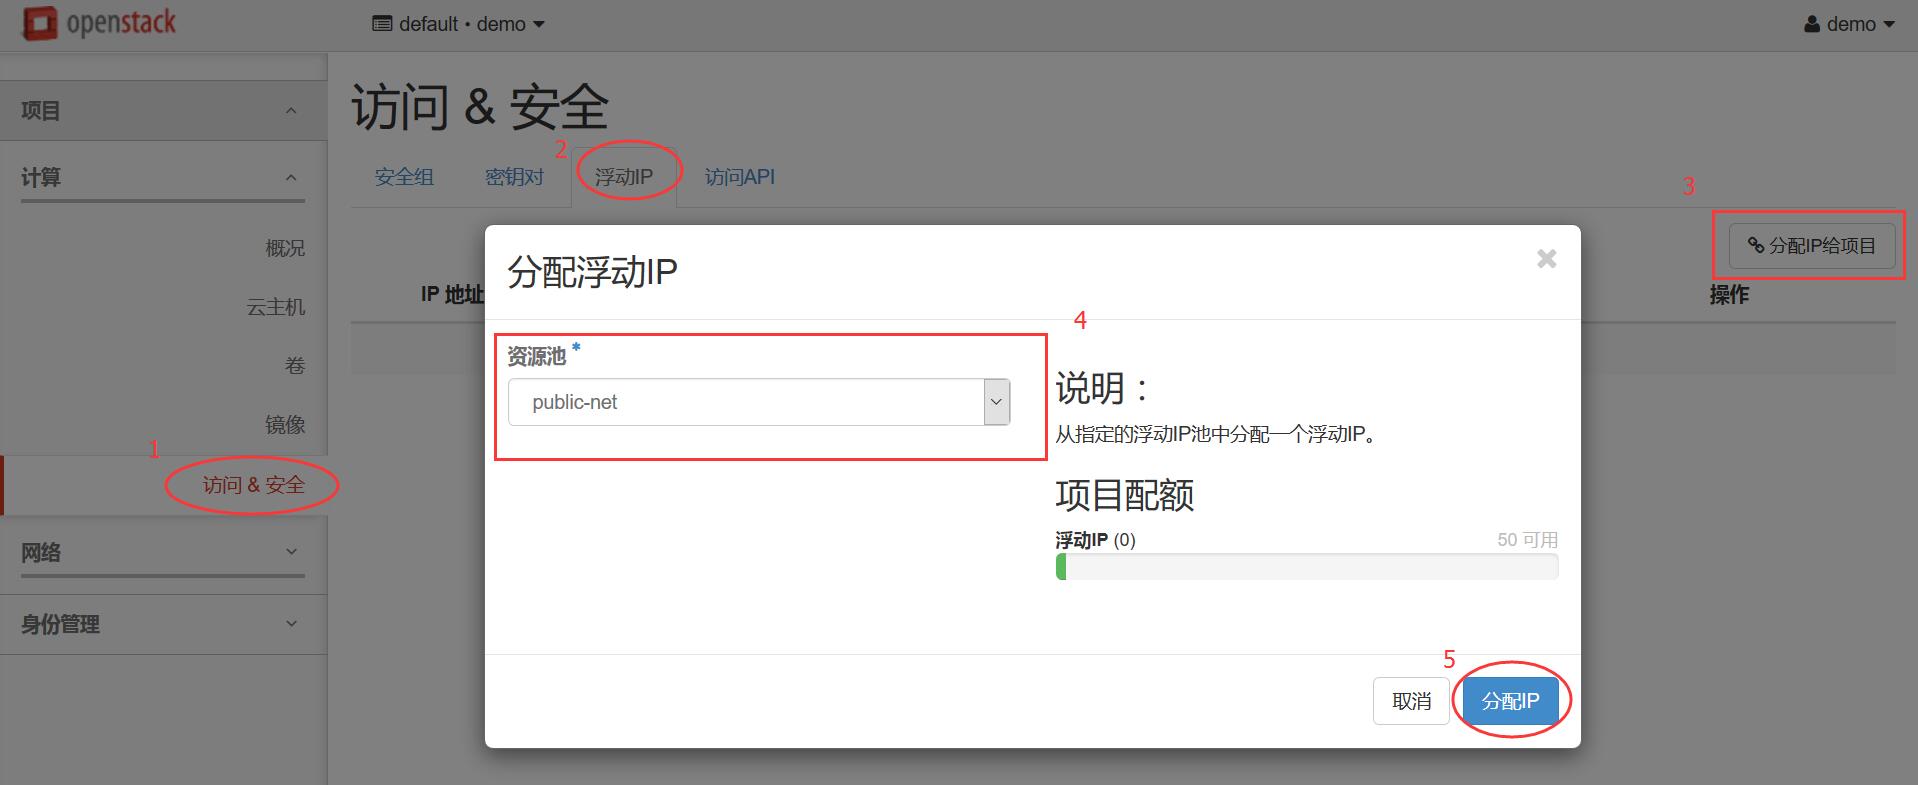
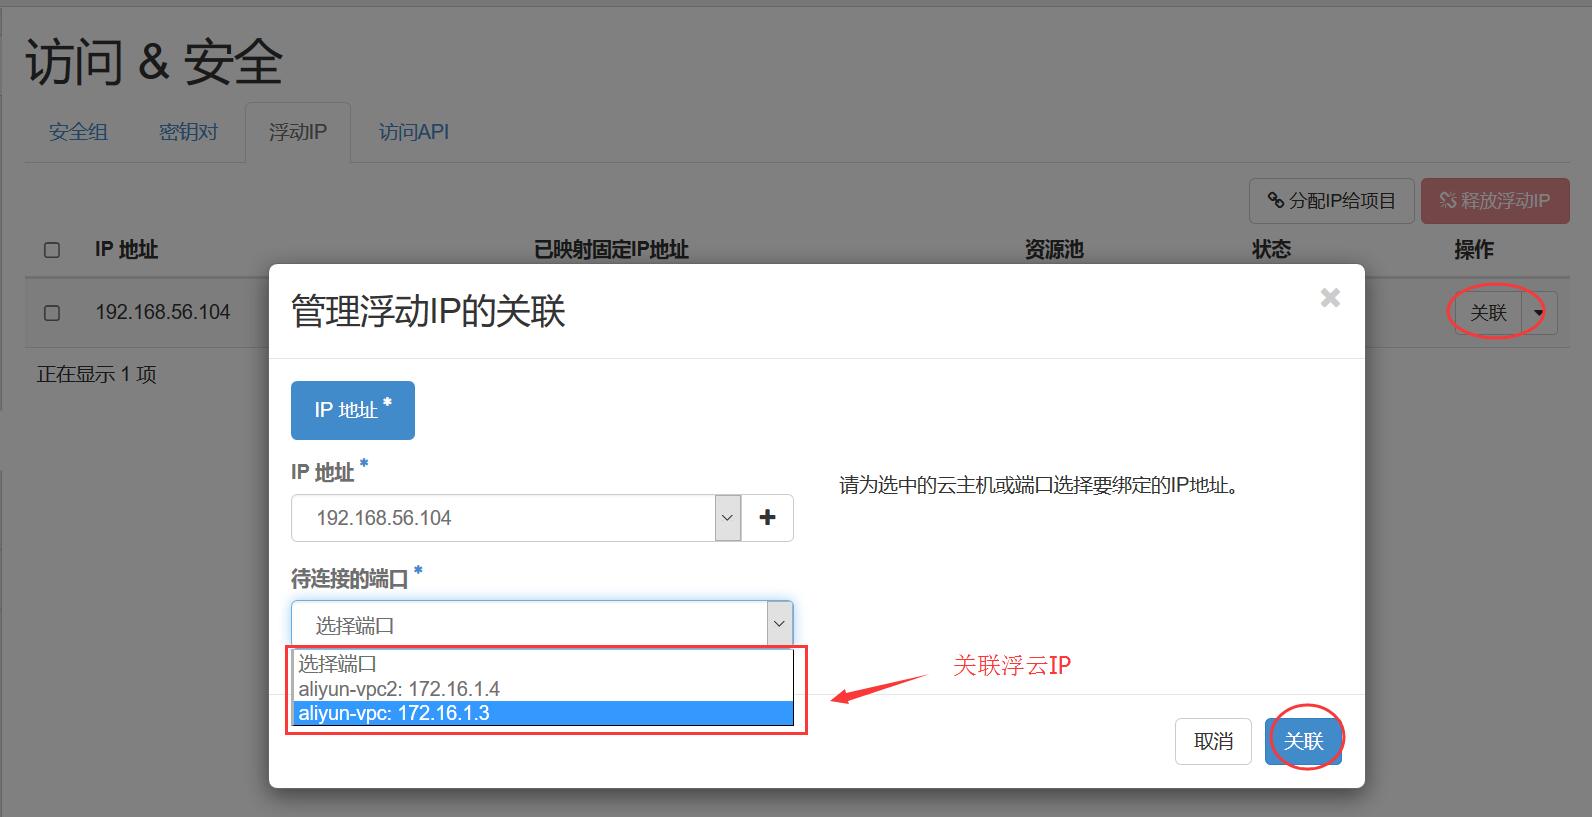
绑定浮动IP
通过浮动IP对外提供访问
查看网络拓扑
注意:生产中vxlan要慎用,测试环境没什么关系。
参考:
https://docs.openstack.org/mitaka/zh_CN/install-guide-rdo/neutron-controller-install-option2.html
https://docs.openstack.org/mitaka/zh_CN/install-guide-rdo/launch-instance-networks-selfservice.html

