KVM虚拟化学习二——KVM创建虚拟机

1.环境准备

  • 查看系统版本内核及IP

[root@linux-node4 ~]# cat /etc/redhat-release
CentOS Linux release 7.2.1511 (Core) 
[root@linux-node4 ~]# uname -r
3.10.0-327.18.2.el7.x86_64
[root@linux-node4 ~]# ifconfig eth0|awk -F "[ :]+" 'NR==2{print $3}'
192.168.56.14
[root@linux-node4 ~]# hostname
linux-node4.example.com
#关闭iptables和selinux

KVM虚拟化学习二——KVM创建虚拟机


2.创建虚拟机

2.1 安装KVM支持组件

[root@linux-node4 ~]# grep -E '(vmx|svm)' /proc/cpuinfo        #检查机器是否支持KVM
flags        : vmx fpu vme de pse tsc msr pae mce cx8 apic sep mtrr pge...
[root@linux-node4 ~]# yum install qemu-kvm qemu-kvm-tools  libvirt virt-install -y   #安装KVM支持组件,组件上篇已经介绍过
[root@linux-node4 ~]# systemctl start libvirtd         #启动kvm管理工具
[root@linux-node4 ~]# systemctl enable libvirtd        #设为开机自动启动
[root@linux-node4 ~]# ifconfig    #libvirt启动后会自动创建一个桥接网卡,默认地址为192.168.122.1
virbr0: flags=4099<UP,BROADCAST,MULTICAST>  mtu 1500
       inet 192.168.122.1  netmask 255.255.255.0  broadcast 192.168.122.255
       ether 52:54:00:28:1d:d4  txqueuelen 0  (Ethernet)
       RX packets 0  bytes 0 (0.0 B)
       RX errors 0  dropped 0  overruns 0  frame 0
       TX packets 0  bytes 0 (0.0 B)
       TX errors 0  dropped 0 overruns 0  carrier 0  collisions 0
[root@linux-node4 ~]# ps aux |grep dnsmasq            #默认还会启动dnsmasq,给虚拟机提供dns和dhcp服务
nobody     2259  0.0  0.0  15552   888 ?        S    14:59   0:00 /sbin/dnsmasq --conf-file=/var/lib/libvirt/dnsmasq/default.conf --leasefile-ro --dhcp-script=/usr/libexec/libvirt_leaseshelper
root       2260  0.0  0.0  15524   180 ?        S    14:59   0:00 /sbin/dnsmasq --conf-file=/var/lib/libvirt/dnsmasq/default.conf --leasefile-ro --dhcp-script=/usr/libexec/libvirt_leaseshelper    
[root@linux-node4 ~]# iptables -t nat -vnL        #安装libvirt时会创建一个virbr0虚拟网卡,默认通过nat来让虚拟机通信
Chain POSTROUTING (policy ACCEPT 219 packets, 16553 bytes)
pkts bytes target     prot opt in     out     source               destination        
   0     0 RETURN     all  --  *      *       192.168.122.0/24     224.0.0.0/24        
   0     0 RETURN     all  --  *      *       192.168.122.0/24     255.255.255.255    
  26  1560 MASQUERADE  tcp  --  *      *       192.168.122.0/24    !192.168.122.0/24     masq ports: 1024-65535
  29  1908 MASQUERADE  udp  --  *      *       192.168.122.0/24    !192.168.122.0/24     masq ports: 1024-65535
   2   168 MASQUERADE  all  --  *      *       192.168.122.0/24    !192.168.122.0/24    
[root@linux-node4 ~]# lsmod |grep kvm
kvm_intel             162153  3
kvm                  525409  1 kvm_intel


2.2 创建虚拟机磁盘

#使用qemu-img创建Centos7虚拟机的镜像,格式为裸磁盘raw,大小为10G
[root@linux-node4 ~]# qemu-img create -f raw /opt/CentOS-7.2-x86_64.raw 10G        
Formatting '/opt/CentOS-7.2-x86_64.raw', fmt=raw size=10737418240        #创建完毕     


2.3 创建虚拟机

[root@linux-node4 ~]# dd if=/dev/cdrom of=/opt/CentOS-7.2.iso        #导入ISO镜像
8456192+0 records in
8456192+0 records out
4329570304 bytes (4.3 GB) copied, 292.596 s, 14.8 MB/s
[root@linux-node4 ~]# virt-install --virt-type kvm --name CentOS-7.2-x86_64 --ram 1024 --cdrom=/opt/CentOS-7.2.iso --disk path=/opt/CentOS-7.2-x86_64.raw --network network=default --graphics vnc,listen=0.0.0.0 --noautoconsole
#监听VNC,若想指定端口加这条--vncport=5900,默认端口为5900,根据虚拟机数量依次增加5901、5902...
Starting install...
Creating domain...                                                                        |    0 B  00:00:02     
Domain installation still in progress. You can reconnect to 
the console to complete the installation process.
[root@linux-node4 ~]# virsh list --all        #安装完后查看虚拟机状态
 Id    Name                           State
----------------------------------------------------
 -     CentOS-7.2-x86_64              shut off
[root@linux-node4 qemu]# virsh start CentOS-7.2-x86_64    #启动安装好的虚拟机
Domain CentOS-7.2-x86_64 started


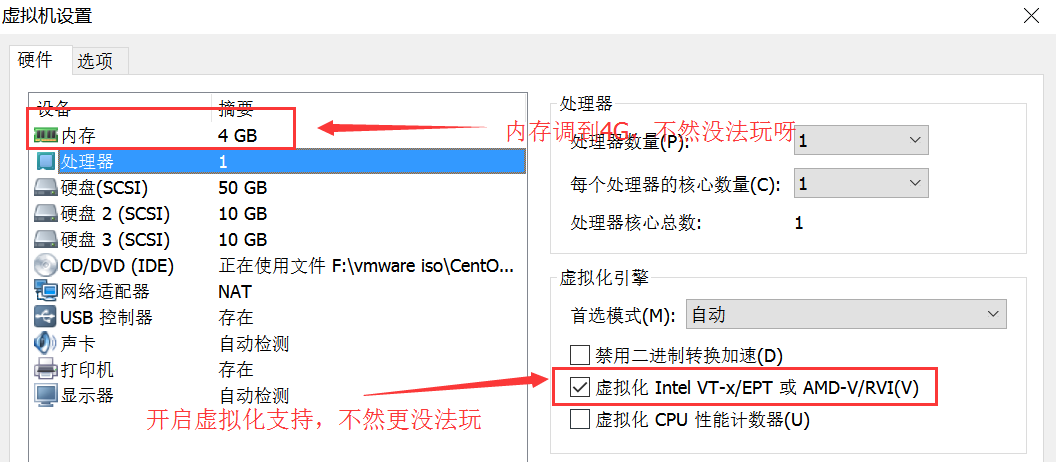
3.安装配置虚拟机

3.1 启动虚拟机时,赶紧使用vnc客户端连接,地址为192.168.56.14:5900

KVM虚拟化学习二——KVM创建虚拟机


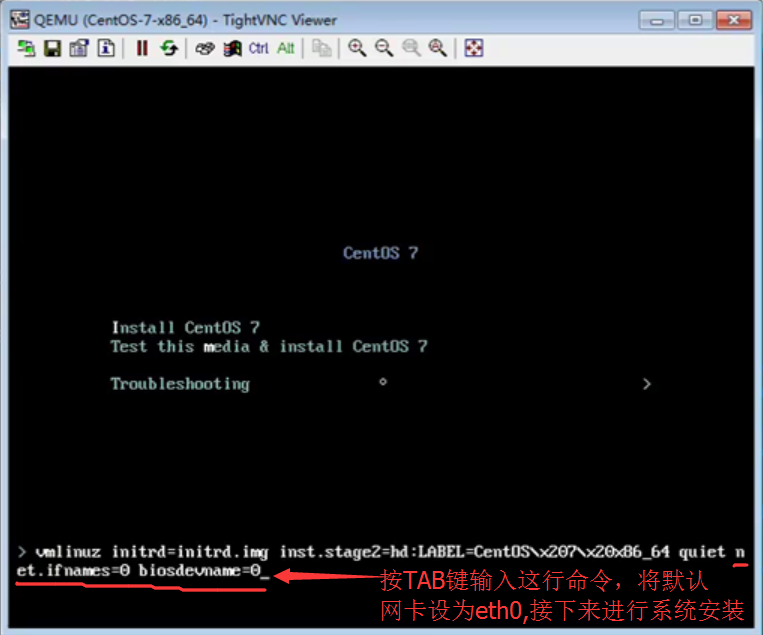
3.2 即可看到虚拟机启动界面,修改网卡参数,安装系统

KVM虚拟化学习二——KVM创建虚拟机


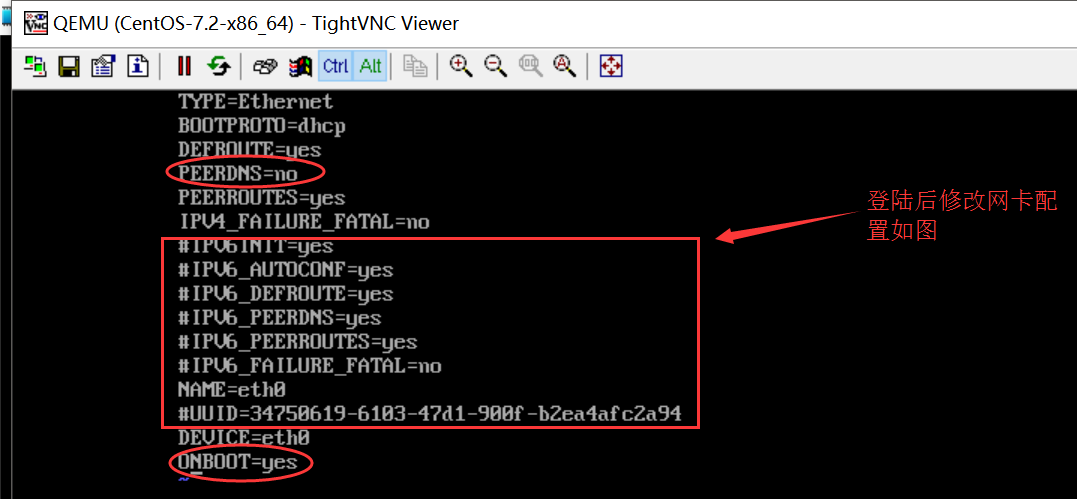
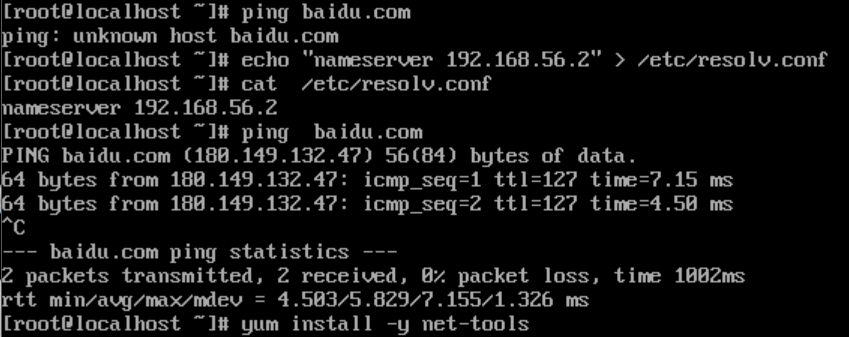
3.3 进入系统后,修改网络配置,然后重启网卡

KVM虚拟化学习二——KVM创建虚拟机

KVM虚拟化学习二——KVM创建虚拟机

◎注意事项

#虚拟机安装后,可以安装上vim screen mtr nc nmap tree lrzsz openssl gcc glibc gcc-c++ make zip dos2unix sysstat vmstat iostat等基础使用软件,也可以把系统做成镜像
#虚拟机启动后,在宿主机上就是一个进程,我们可以像管理进程一样来管理
[root@linux-node4 ~]# ps aux|grep kvm
root        726  0.0  0.0      0     0 ?        S<   14:59   0:00 [kvm-irqfd-clean]
qemu       2827  4.4 13.5 1550060 522164 ?      Sl   15:40   0:45 /usr/libexec/qemu-kvm -name CentOS-7.2-x86_64 -S -machine pc-i440fx-rhel7.0.0,accel=kvm,usb=off -cpu Haswell,-rtm,-hle -m 1024 -realtime mlock=off -smp 1,maxcpus=4,sockets=4,cores=1,threads=1 -uuid f7c3
#安装时若报这个错误ERROR:Guest name 'CentOS-7.2-x86_64' is already in use. 执行下面这条命令把虚拟机和相应的xml配置文件都干掉,就可以用virt-install安装了。
[root@linux-node4 ~]# virsh undefine CentOS-7.2-x86_64
Domain CentOS-7.2-x86_64 has been undefined
#安装虚拟机时会在/etc/libvirt/qemu/目录下生成虚拟机的xml配置文件
[root@linux-node4 qemu]# ll /etc/libvirt/qemu/CentOS-7.2-x86_64.xml 
-rw------- 1 root root 3982 Jul 21 12:23 /etc/libvirt/qemu/CentOS-7.2-x86_64.xml

anzhihe 安志合个人博客,版权所有 丨 如未注明,均为原创 丨 转载请注明转自:https://chegva.com/1227.html | ☆★★每天进步一点点,加油!★★☆ | 

您可能还感兴趣的文章!

发表评论

电子邮件地址不会被公开。 必填项已用*标注