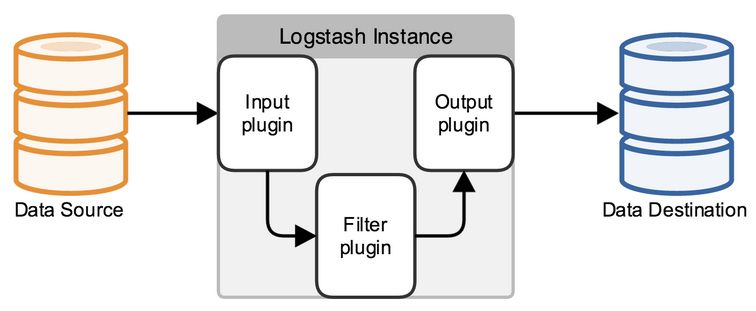
1. Logstash工作原理
INPUT:收集数据 FILTER:数据过滤 OUTPUT:传送数据 inputs → filters → outputs
1.1 logstash概念
行 -- 事件
input output是必须有的
事件 -> input(输入) -> codec(编码) -> filter(过滤) -> codec(解码) -> output(输出)
2. Logstash插件使用
logstach主要依赖插件来工作:stdin{} -- 输入插件,stdout{} -- 输出插件
2.1 标准输入输出
[root@linux-node1 ~]# /opt/logstash/bin/logstash -e 'input { stdin{} } output { stdout{} }'
Settings: Default pipeline workers: 1
Pipeline main started
hello
2016-08-20T12:54:18.592Z linux-node1.example.com hello
anzhihe
2016-08-20T12:54:20.978Z linux-node1.example.com anzhihe
2.2 json格式输出
[root@linux-node1 ~]# /opt/logstash/bin/logstash -e 'input { stdin{} } output { stdout{ codec => rubydebug} }'
Settings: Default pipeline workers: 1
Pipeline main started
hello anzhihe!
{
       "message" => "hello anzhihe!",
      "@version" => "1",
    "@timestamp" => "2016-08-20T12:55:38.703Z",
          "host" => "linux-node1.example.com"
}
2.3 调用插件输出到es
[root@linux-node1 /opt/logstash]# /opt/logstash/bin/logstash -e 'input { stdin{} } output { elasticsearch { hosts=>["192.168.56.11:9200"] index => "logstash-%{+YYYY.MM.dd}" } }'
Settings: Default pipeline workers: 2
Pipeline main started
hehe
haha
你好,
hello world!
2.4 同时输出到界面和es上
[root@linux-node1 ~]# /opt/logstash/bin/logstash -e 'input { stdin{} } output {  stdout{ codec => rubydebug}  elasticsearch { hosts=>["192.168.56.11:9200"] index => "logstash-%{+YYYY.MM.dd}" } }'
Settings: Default pipeline workers: 1
Pipeline main started
哈哈
{
       "message" => "哈哈",
      "@version" => "1",
    "@timestamp" => "2016-08-20T13:09:12.675Z",
          "host" => "linux-node1.example.com"
}
3. Logstash配置文件设置
3.1 logstash启动脚本配置信息
[root@linux-node1 /opt/logstash]# vim /etc/init.d/logstash
pidfile="/var/run/$name.pid"
LS_USER=logstash
LS_GROUP=logstash
LS_HOME=/var/lib/logstash
LS_HEAP_SIZE="1g"
LS_LOG_DIR=/var/log/logstash
LS_LOG_FILE="${LS_LOG_DIR}/$name.log"
LS_CONF_DIR=/etc/logstash/conf.d        #配置文件目录
......
program=/opt/logstash/bin/logstash
#启动参数
args="agent -f ${LS_CONF_DIR} -l ${LS_LOG_FILE} ${LS_OPTS}"
3.2 使用配置文件收集信息
[root@linux-node1 /etc/logstash/conf.d]# pwd
/etc/logstash/conf.d
[root@linux-node1 /etc/logstash/conf.d]# cat demo.conf
input{
    stdin{}
}

filter{
}

output{
    elasticsearch {
    hosts => ["192.168.56.11:9200"] # => 相当于等号,数组用 []
    index => "logstash-%{+YYYY.MM.dd}" #  字符串用 ""
    }
    stdout{
        codec => rubydebug
    }
}

[root@linux-node1 /etc/logstash/conf.d]# /opt/logstash/bin/logstash -f /etc/logstash/conf.d/demo.conf
Settings: Default pipeline workers: 2
Pipeline main started
hhhhhhhhhhhhhhhhhhhhhhhhhhhhhhhhhhkkkkkkdkdkd
{
       "message" => "hhhhhhhhhhhhhhhhhhhhhhhhhhhhhhhhhhkkkkkkdkdkd",
      "@version" => "1",
    "@timestamp" => "2017-03-22T18:56:26.839Z",
          "host" => "linux-node1.example.com"
}
城叶坜遥坜热烈二盂
Received an event that has a different character encoding than you configured. {:text=>"\\xE5城叶坜遥坜热烈二盂", :expected_charset=>"UTF-8", :level=>:warn}
{
       "message" => "\\xE5城叶坜遥坜热烈二盂",
      "@version" => "1",
    "@timestamp" => "2017-03-22T18:56:48.880Z",
          "host" => "linux-node1.example.com"
}

