自动化测试学习笔记一——Selenium1和Selenium2的原理及启动有配置项的浏览器

  • 上章练习题答案

//book
//book/title
//book/@category
//book[1]/price/text()
//book[last()]/author
//book[last()-1][@category]
//book[price>35]/title
//book[price>=30 and price<=40]/title
//book[count(author)>1]/title
//book[count(author)>1]/author/text()
//book[@category='web' and price<40]
//book/title[contains(text(),'X')]/../price
//book[@category='web']/author[not (contains(text(),'James'))]/text()


1.Selenium概述

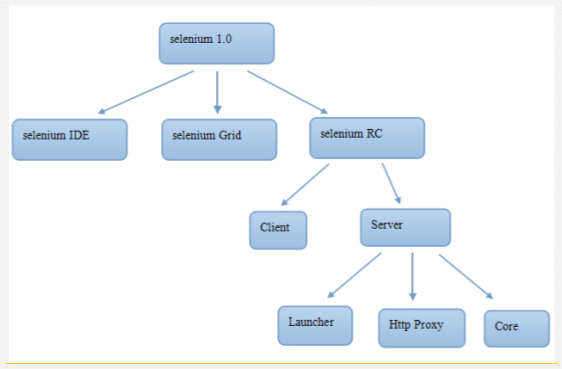
▼ Selenium也不是简单一个工具,而是由几个工具组成,每个工具都有其特点和应用场景

Selenium Ide 火狐的插件
Selenium grid 自动化的测试辅助工具,Grid通过利用现有的计算机基础设施,能加快Web-app的功能测试。利用Grid,可以很方便地同时在多台机器上和异构环境中并行运行多个测试事例
Selenium RC 远程控制,核心

  • Selenium1.0原理

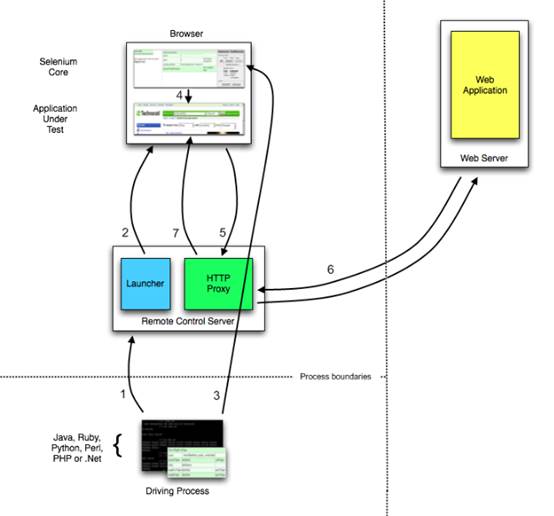
浏览器有个同源策略:区分域名,不是我那个网站下的js,不会执行,不能远程植入js
Selenium1实现:远程控制server,通过http代理伪装,骗过同源策略,将核心js植入浏览器,运行把结果返回给我。
域名会不断的变化,发现域名变化,再起一个web server 绕过域名
对浏览器远程的植入js来完成自动化的操作
跨平台,多语言,因为remote control有个语言翻译的功能。翻译成js,植入到浏览器
不足:速度不理想,而且稳定性大大依赖于Selenium内核对API翻译成的Javascript质量高低


自动化测试学习笔记一——Selenium1和Selenium2的原理及启动有配置项的浏览器

自动化测试学习笔记一——Selenium1和Selenium2的原理及启动有配置项的浏览器


2.Selenium2介绍

▼ Selenium2原理简介

Selenium2=selenium1+webdriver
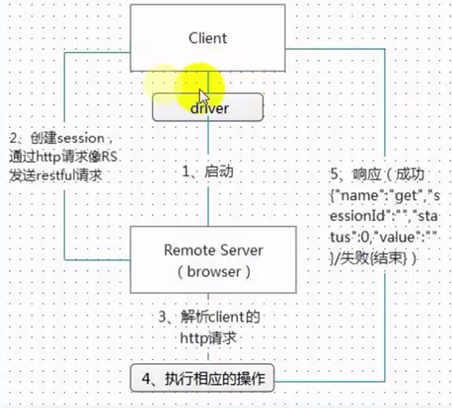
WebDriver通过原生浏览器支持或者浏览器扩展直接控制浏览器。
浏览器的各个厂商要支持webdriver统一的api
WebDriver针对各个浏览器而开发,取代了嵌入到被测Web应用中的JavaScript与浏览器的紧密集成支持创建更高级的测试,避免了JavaScript安全模型导致的限制除了来自浏览器厂商的支持,WebDriver还利用操作系统级的调用模拟用户输入。
直接与浏览器通讯

  • Selenium2优势

1、不需要分布式部署,可独立运行
2、独立API易学、易维护
3、扩展性强

  • Selenium2原理图

自动化测试学习笔记一——Selenium1和Selenium2的原理及启动有配置项的浏览器


3.学习路线

▼ 学习步骤

学好一门语言(为什么是java? 社区多,框架工具多),需要熟悉webdriver API,学习元素的定位,学习并使用单元测试框架,在脚本中加一些验证与断言,试着包装适合自己业务的API,定制日志和测试报告,学习利用CI工具持续部署,站的比自动化测试更高

  • 学习资源

社区:TesterHome,Selenium中文网
博客:虫师,张飞,云层
Webdriver基础
Webdriver官网 openQA的社区  维护Webdriver
Selenium IDE(嵌入到Firefox浏览器中的一个插件,实现简单的浏览器操作的录制与回放功能
)的使用
关键字驱动:封装一些关键字,通过操作关键字执行相应的操作
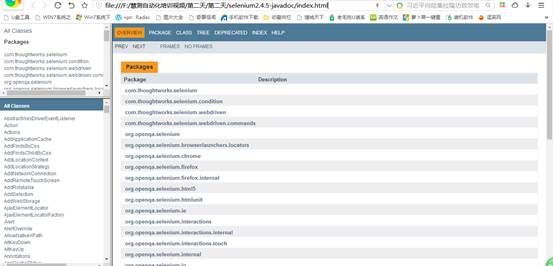
selenium2.4.5-javadoc   selenium API文档


自动化测试学习笔记一——Selenium1和Selenium2的原理及启动有配置项的浏览器


4.启动有配置项的浏览器

Driver

Eclipse怎么关联selenium源码包
典型的脚本流:
Step = Driver(Browser)+Action
Step = Driver(Browser)+WebElement+Action+Data
Assert
核心:
浏览器的生命周期 : new ,action(单页面内、页面跳转),close
主要浏览器Driver介绍
FireFoxDriver
1、默认安装路径启动: SELENIUM2 在启动浏览器时,都是启动一个干净的没有任务 插件及cookies信息的浏览器
2、指定浏览器执行文件位置
3、FireFoxProfile:
在浏览器地址栏输入:about:config,可以手动设置浏览器或者浏览器插件属性
Browser.(跟浏览器有关的属性设置)
作用:保存用户配置信息(浏览器设置信息(about:config),插件以及设置,书签,历史记录,用户名、密码,临时文件、网站数据,cookies)
自定义Profile启动:安装插件(firebug)
设置属性
插件属性:firebug,利用firebug自动收集网站前端性能数据(http://www.softwareishard.com/har/viewer/)
前端页面性能自动获取(监控)
netExport-0.8.xpi(Firebug的扩展),导出成har格式
浏览器属性:默认下载路径,代理参数,主页地址
利用存在的Profile
方式:
1、点击windows“开始”-->“运行”,输入框输入firefox.exe -ProfileManager
2、%APPDATA%
利用profile名称启动
利用profile物理路径
  • 代码

//默认安装路径启动

System.setProperty("webdriver.firefox.bin", "C:/Program Files (x86)/Mozilla Firefox/firefox.exe");   

//启动不在默认安装路径的firefox

           FirefoxDriver firefoxdriver = new FirefoxDriver();                                        firefoxdriver.get("http://www.baidu.com");

//启动指定exe的firefox

FirefoxBinary binary = new FirefoxBinary(new File("C:/Program Files (x86)/Mozilla Firefox/firefox.exe"));

FirefoxDriver driver = new FirefoxDriver(binary, null);

//动态加载firebug

           FirefoxProfile profile = new FirefoxProfile();

           profile.addExtension(new File("D:/firebug-2.0.17.xpi"));

           profile.setPreference("extensions.firebug.currentVersion", "2.0.17");

           profile.setEnableNativeEvents(true);  //启用firefox被禁用功能

           profile.setPreference("extensions.firebug.allPagesActivation", "on"); 

//启动 自动开启firebug(设置插件属性)

           FirefoxDriver driver = new FirefoxDriver(profile);

//设置浏览器属性

           String proxyIp = "10.17.171.11";

           int proxyPort = 8080;

           FirefoxProfile profile = new FirefoxProfile();

//设置代理参数

           profile.setPreference("network.proxy.type", 1);

           profile.setPreference("network.proxy.http", proxyIp);

           profile.setPreference("network.proxy.http_port", proxyPort);

//设置默认下载路径

           profile.setPreference("browser.download.folderList", 2);

           profile.setPreference("browser.download.dir", "D:\\");         

           FirefoxDriver driver = new FirefoxDriver(profile);

//设置主页地址

           profile.setPreference("browser.startup.homepage", "http://www.huicewang.com");

           FirefoxDriver driver = new FirefoxDriver(profile);

//启动指定用户配置文件的firefox

           FirefoxProfile profile = new FirefoxProfile(new File("D:\\"));

           profile.addExtension(new File("source/firebug-2.0.17.xpi"));

           profile.addExtension(new File("D:/netExport-0.8.xpi"));

           profile.setPreference("extensions.firebug.currentVersion", "2.0.17");

           profile.setPreference("extensions.firebug.allPagesActivation", "on");

           profile.setPreference("extensions.firebug.defaultPanelName", "net");

           profile.setPreference("extensions.firebug.net.enableSites", true);

       profile.setPreference("extensions.firebug.netexport.alwaysEnableAutoExport", true);

           profile.setPreference("extensions.firebug.netexport.saveFiles", true);

           profile.setPreference("extensions.firebug.netexport.defaultLogDir", "d:\\");

           FirefoxDriver driver = new FirefoxDriver(profile);

           Thread.sleep(2000);

           driver.get("http://www.baidu.com");

           driver.get("http://www.huicewang.com");          

//通过配置文件名称启动指定firefox

           ProfilesIni allProfiles = new ProfilesIni(); 

           FirefoxProfile profile = allProfiles.getProfile("default"); 

           FirefoxDriver driver = new FirefoxDriver(profile);
anzhihe 安志合个人博客,版权所有 丨 如未注明,均为原创 丨 转载请注明转自:https://chegva.com/1501.html | ☆★★每天进步一点点,加油!★★☆ | 

您可能还感兴趣的文章!

发表评论

电子邮件地址不会被公开。 必填项已用*标注