1. 配置存储节点前环境准备
1.1 安装LVM
安装LVM包
[root@linux-node2 ~]# yum install lvm2 -y
启动LVM
[root@linux-node2 ~]# systemctl enable lvm2-lvmetad.service
[root@linux-node2 ~]# systemctl start lvm2-lvmetad.service
1.2 创建LVM物理卷
添加一块20G的硬盘重起node2
/dev/sdb登陆LVM物理卷
[root@linux-node2 ~]# pvcreate /dev/sdb
  Physical volume "/dev/sdb" successfully created.
创建LVM卷组
cinder-volumes[root@linux-node2 ~]# vgcreate cinder-volumes /dev/sdb Volume group "cinder-volumes" successfully created
块存储服务会在这个卷组中创建逻辑卷。
编辑
/etc/lvm/lvm.conf文件,在devices部分,添加一个过滤器,只接受/dev/sdb设备,拒绝其他所有设备devices { ... filter = [ "a/sdb/", "r/.*/"]
2. 配置组件
2.1 安装软件包
[root@linux-node2 ~]# yum install openstack-cinder targetcli python-keystone
2.2 编辑配置/etc/cinder/cinder.conf
#将node1上的/etc/ciner/cinder.conf拷贝到相同路径下
[root@linux-node2 cinder]# scp root@192.168.56.11:/etc/cinder/cinder.conf .
[root@linux-node2 cinder]# ll cinder.conf
-rw-r----- 1 root cinder 125835 Apr 28 23:17 cinder.conf

#在 [lvm] 部分,配置LVM后端以LVM驱动结束,卷组cinder-volumes,iSCSI协议和正确的iSCSI服务(文件最后添加即可)
[lvm]
volume_driver = cinder.volume.drivers.lvm.LVMVolumeDriver   #使用lvm驱动
volume_group = cinder-volumes   #使用lvm的vg
iscsi_protocol = iscsi      #使用iscsi协议
iscsi_helper = lioadm       #iscsi管理工具
volume_backend_name=iSCSI-Storage   #命名

#在 [DEFAULT] 部分,启用 LVM 后端
[DEFAULT]
...
enabled_backends = lvm

#在 [DEFAULT] 区域,配置镜像服务 API 的位置
[DEFAULT]
...
glance_api_servers = http://192.168.56.11:9292
2.3 最终配置如下
[root@linux-node2 cinder]# grep "^[a-z]" cinder.conf
glance_host = 192.168.56.11
glance_api_servers = http://192.168.56.11:9292
auth_strategy = keystone
enabled_backends = lvm
rpc_backend = rabbit
connection = mysql+pymysql://cinder:cinder@192.168.56.11/cinder
auth_uri = http://192.168.56.11:5000
auth_url = http://192.168.56.11:35357
memcached_servers = 192.168.56.11:11211
auth_type = password
project_domain_name = default
user_domain_name = default
project_name = service
username = cinder
password = cinder
lock_path = /var/lib/cinder/tmp
rabbit_host = 192.168.56.11
rabbit_userid = openstack
rabbit_password = openstack
volume_driver = cinder.volume.drivers.lvm.LVMVolumeDriver
volume_group = cinder-volumes
iscsi_protocol = iscsi
iscsi_helper = lioadm
volume_backend_name=iSCSI-Storage
2.4 启动服务
启动块存储卷服务及其依赖的服务,并将其配置为随系统启动:
[root@linux-node2 cinder]# systemctl enable openstack-cinder-volume.service target.service
[root@linux-node2 cinder]# systemctl start openstack-cinder-volume.service target.service
3. 验证操作
3.1 获得 admin 凭证来获取只有管理员能执行的命令的访问权限
[root@linux-node1 ~]# source admin-openstack.sh
3.2 列出服务组件以验证是否每个进程都成功启动
[root@linux-node1 ~]# cinder service-list
+------------------+-----------------------------+------+---------+-------+----------------------------+-----------------+
|      Binary      |             Host            | Zone |  Status | State |         Updated_at         | Disabled Reason |
+------------------+-----------------------------+------+---------+-------+----------------------------+-----------------+
| cinder-scheduler |   linux-node1.example.com   | nova | enabled |   up  | 2017-04-28T15:34:21.000000 |        -        |
|  cinder-volume   | linux-node2.example.com@lvm | nova | enabled |   up  | 2017-04-28T15:34:16.000000 |        -        |
+------------------+-----------------------------+------+---------+-------+----------------------------+-----------------+
cinder-scheduler和cinder-volume状态都为up说明配置成功,若失败注意时间同步。
3.2 创建云主机
以
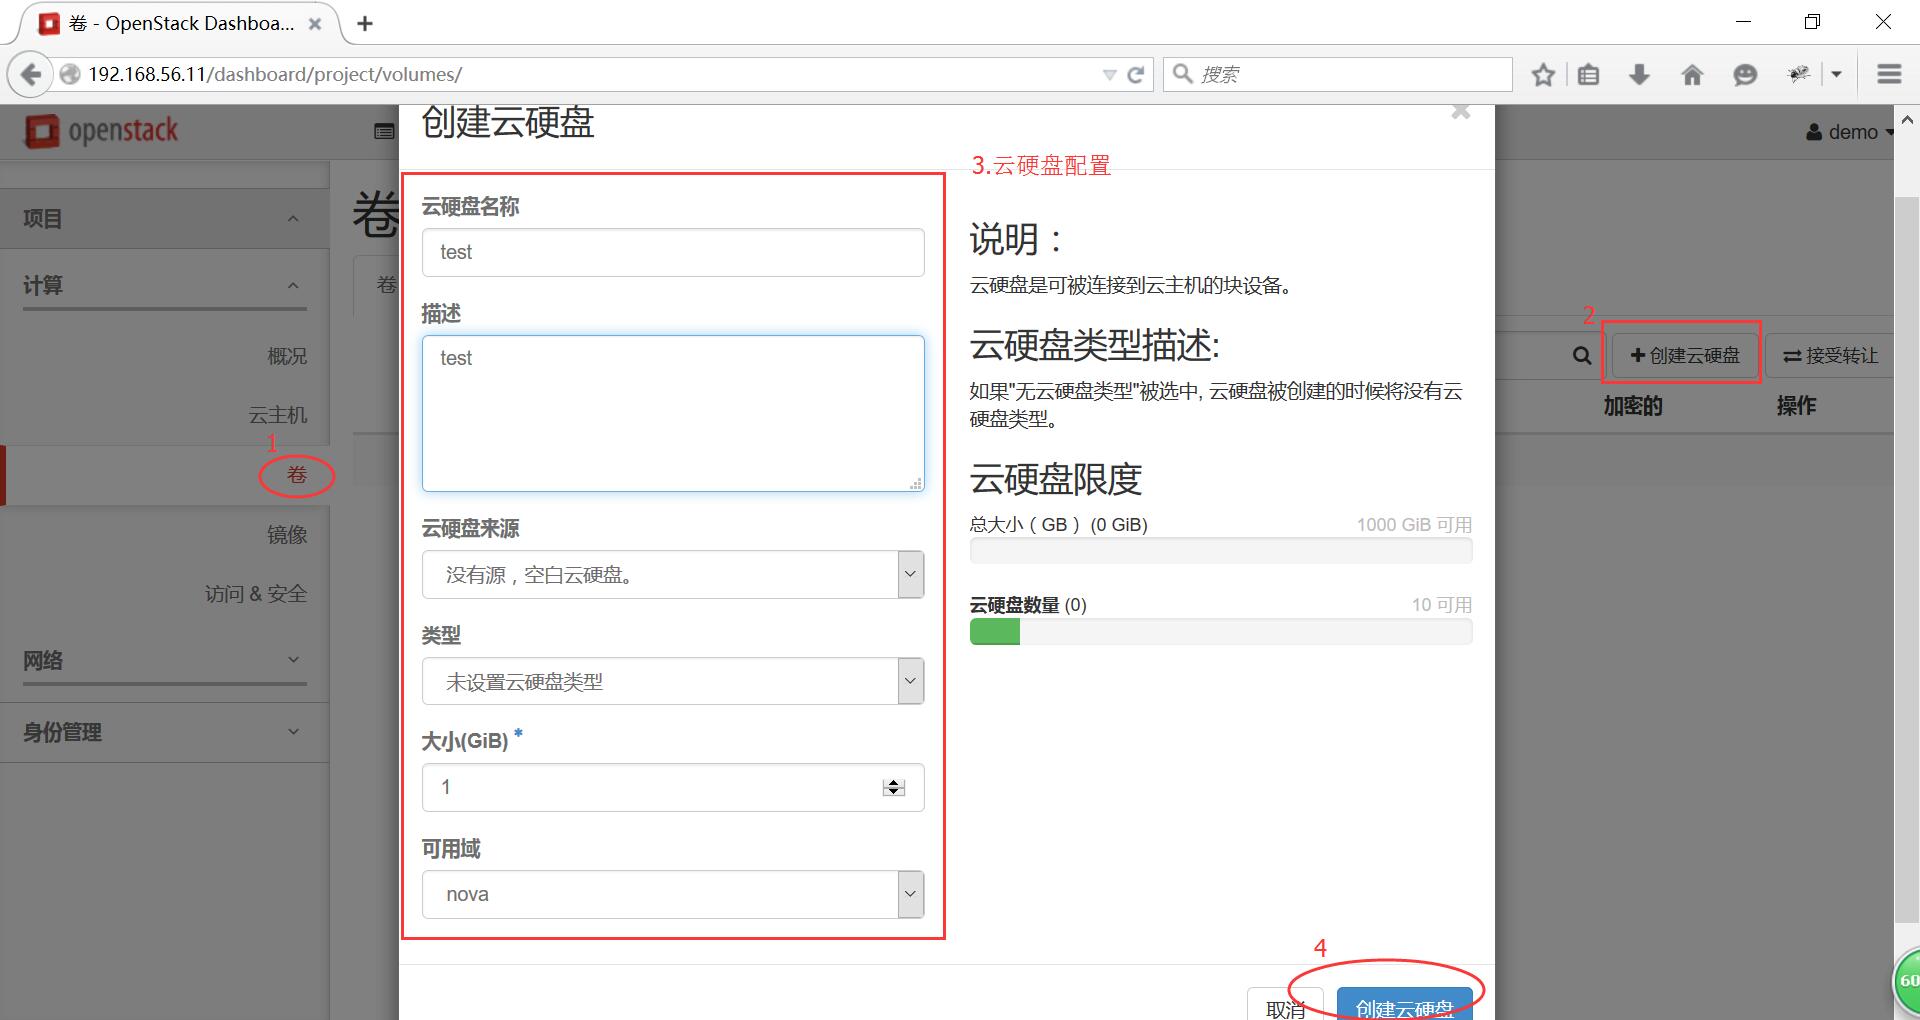
demo用户登陆dashboard创建云硬盘
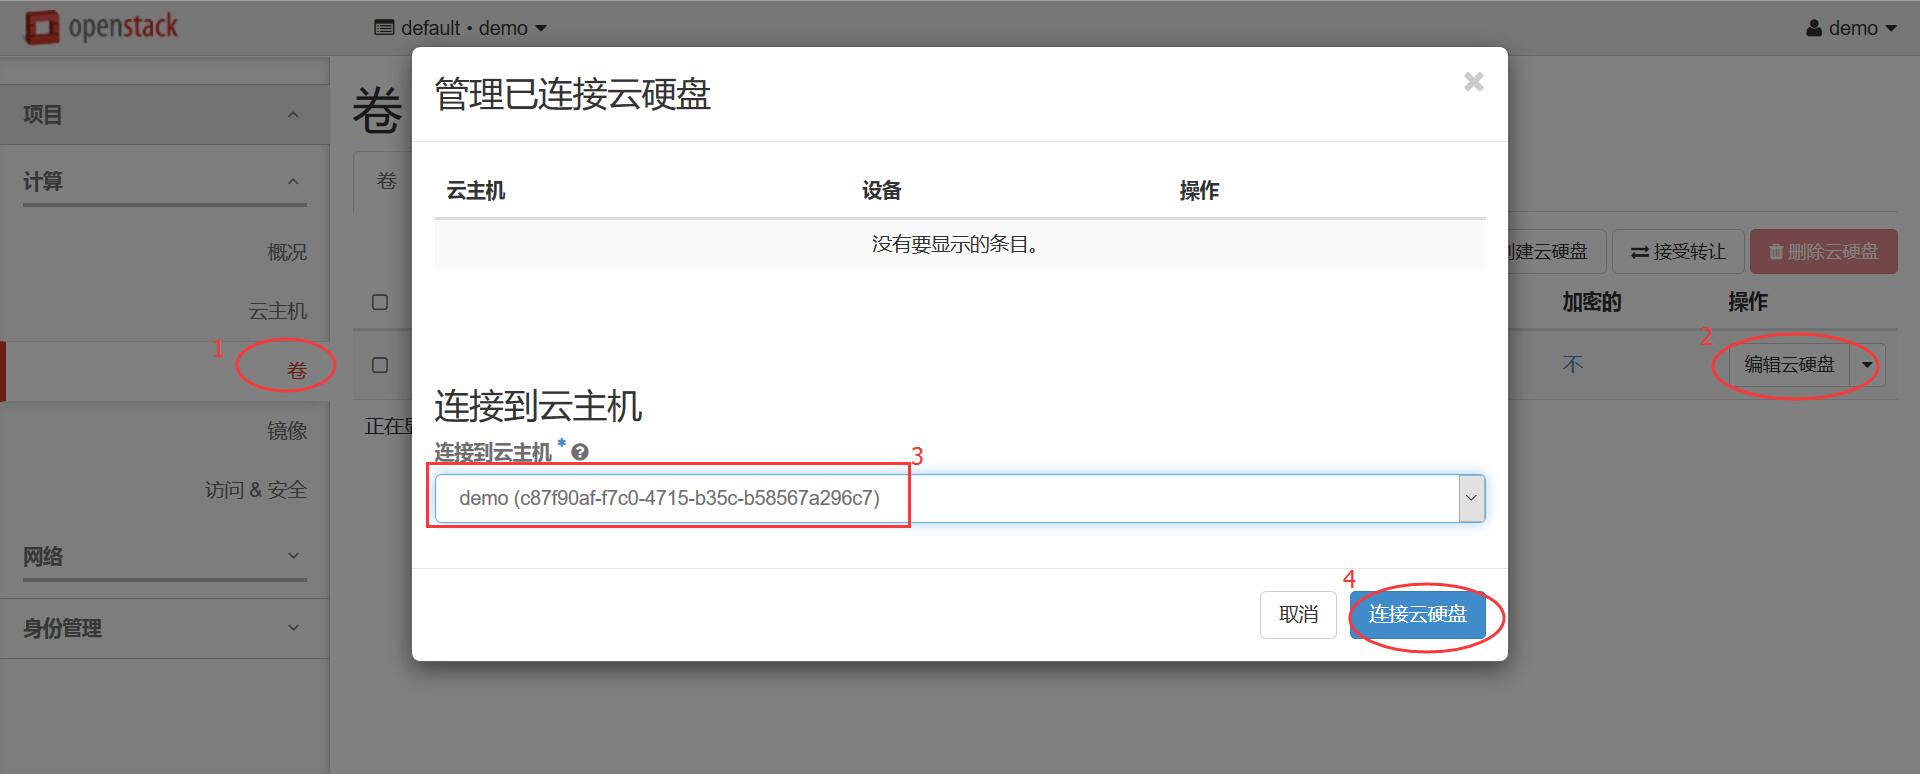
将创建好的云硬盘挂载到云主机上(卷-->管理云硬盘-->连接云硬盘)
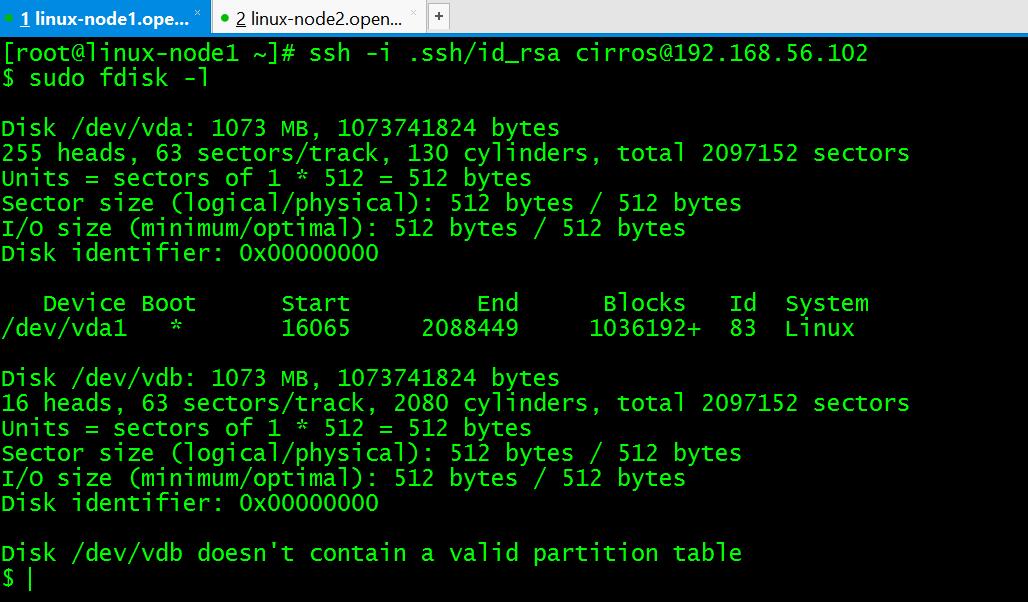
云硬盘格式化挂载即可使用
[root@linux-node2 cinder]# lvdisplay
  --- Logical volume ---
  LV Path                /dev/cinder-volumes/volume-6ed171a5-89a5-4630-b015-927ccc2e2483
  LV Name                volume-6ed171a5-89a5-4630-b015-927ccc2e2483
  VG Name                cinder-volumes
  LV UUID                b5CeG2-sdc2-aGaI-8EvF-pGod-OYbl-zlAp3b
  LV Write Access        read/write
  LV Creation host, time linux-node2.example.com, 2017-04-28 23:44:57 +0800
  LV Status              available
  # open                 1
  LV Size                1.00 GiB
  Current LE             256
  Segments               1
  Allocation             inherit
  Read ahead sectors     auto
  - currently set to     8192
  Block device           253:0
Cinder:
本地硬盘:IOPS(性能好),稳定性高 缺点:容量固定,不利于迁移
本地硬盘+云硬盘:系统使用本地硬盘,数据盘(如/data) 使用云硬盘
云硬盘:安全性,容错性,性能要求高
后端存储: NFS iSCSI GlusterFS Ceph
分布式文件系统缺点:分布式文件系统一挂,所有虚机都会挂掉,文件损坏也一样,维护成本高。


单击反馈很秀
@azeqjz 哈哈,和谐和谐